Precision Gauge Blocks
Precision Gauge Blocks, also sometimes referred to as Slip Gauges or “Jo Blocks”, are the foundation of physical measurement in mechanical engineering. Traditionally, they were the standard by which all other precision measuring instruments, gauges and even machine tools were set or calibrated. Every toolroom or precision manufacturer in the country would have had at least one set of these gauges. In more recent years gauge blocks have become slightly usurped by other even more accurate methods, particularly Laser Interferometry, but they still remain a fundamental standard for many applications.
At least two manufacturers of gauge blocks were once located in Warwickshire. They were the Coventry Gauge and Tool Company (Matrix), situated on the Fletchamstead Highway, in Coventry and Alan Browne Gauges at Blackdown on the Kenilworth Road, Leamington Spa. Matrix particularly enjoyed a worldwide reputation for their products, and Alan Browne Gauges claimed to be the last manufacturer of metallic Gauge Blocks in this country. Gauge blocks for many years were manufactured from specially selected highly stable steels, but recently tungsten carbide, chromium carbide or ceramic materials have become more prevalent. Each have their advantages and disadvantages. All gauge blocks are extremely hard, irrespective of the material from which they are made.
The history of gauge blocks date back to the nineteenth century when a Swedish engineer, Carl Edvard Johansson (1864-1943), realising there was an absence of fundamental precision standards, devised a system of super- accurate blocks that were so exact that they could be “wrung together” to form a very comprehensive range of attainable dimensions; hence the term “Jo Blocks”. Johansson first introduced his gauge blocks in 1888 at the Carl Gustav Swedish state armoury at Eskilstuna. In May 1901 Johansson was granted Swedish Patent SE No 17017, for “Gauge Block Sets for Precision Measurement”. Subsequently, in 1917, he formed the company CE Johansson AB, to manufacture his gauge blocks, carrying what was to become the famous “CEJ” logo. These became the precursors for all subsequent precision gauge blocks.
Carl Johansson was a very frequent visitor to the United States of America, and in 1908 he sold his first gauge blocks to the Cadillac Automobile Company. In 1919 he set up a manufacturing plant at Poughkeepsie, Dutchess County, New York, to supply gauge blocks in the USA. Almost inevitably Henry Ford became interested in Johansson’s products and eventually he acquired Johansson’s interests in the USA, proceeding to manufacture block gauges for both internal Ford use and customers prepared to purchase them.
Gauge blocks are manufactured in both Imperial and Metric measuring systems and in a variety of grades of accuracy ranging from Workshop Grade or equivalent (the lowest) to Reference Grade or equivalent (the highest). Normally a full Imperial set comprises 81 gauges, ranging in size from 0.050” to 4”. Typically, an Imperial Workshop Grade set will not exceed the following limits of dimensional deviation, from nominal, for each individual gauge block:
Up to and including 1 inch (+10 – 5 millionths of an inch)
Up to and including 2 inch (+20 -10 millionths of an inch)
Up to and including 3 inch (+30 -15 millionths of an inch)
Up to and including 4 inch (+40 -20 millionths of an inch)
Inspection, Calibration and Reference Grades, or their equivalents, will be manufactured to progressively finer limits than those stated above.
A calibration certificate, traceable back to the National Physical Laboratory (or some other international Standard), will be supplied with each set of gauge blocks, on which the actual deviation of each block from the nominal dimension is recorded. Calibration of the blocks is carried out in a certificated and approved standards room, temperature controlled at 68 degrees F (20 degrees Celsius). In practical terms gauge blocks should only be used at the calibration temperature, and minimally handled to avoid introducing errors from linear expansion.
As can be seen from the above table, gauge blocks are manufactured to extremely fine limits of dimensional accuracy across their gauging surfaces. Not only this, the gauges are also held to very tight limits of geometrical form for squareness, parallelism and flatness. Lapping machines of some form or another are used in conjunction with diamond lapping pastes, of progressively finer grades, to obtain mirror finishes on the gauging surfaces.
As previously stated, gauge blocks are designed to be “wrung” together to enable any desired dimension to be obtained within their measuring range. It is considered good practice to use only the minimum number of blocks to construct a given dimensional pack. This is to obviate unnecessary wear to blocks and minimise inaccuracy. In “wringing” two gauge blocks together, one block is placed perpendicular to the other, across the gauging faces, and twisted. With new gauge blocks, or ones in good condition, “wringing” is accomplished almost instantaneously. Gauge blocks in slightly worn or used condition may require additional effort to obtain satisfactory “wringing”. The process is reversed for separating the gauge blocks. A force of up to 300N (67lbs f) may be necessary to separate the blocks. Gauge blocks should not be left wrung together for prolonged periods as they will tend to “weld” or “fuse” together and become virtually immovable. Usually two additional sacrificial“wear blocks” are incorporated in gauge block sets, and these should be used wherever possible at each end of any given dimensional pack to minimise undue wear on other blocks.
Even today it is not precisely known how “wringing” actually occurs, but it may be attributable in varying degrees to the following phenomena, but particularly b) & c):
a) Atmospheric Pressure being exerted on the blocks (although wringing can be achieved in a vacuum).
b) Surface Tension from the microscopic amounts of oil and water film between the contact surfaces.
c) Molecular Attraction associated with surfaces in extremely close contact; this is not a function of magnetism.
A number of years ago the author of this paper was associated with Alan Browne Gauges Ltd, at Blackdown, in the manufacture of their range of gauge blocks. It was a very interesting exercise and hopefully rewarding for both parties, The author’s brief was to design a set of new lapping machines to replace their rather well worn existing equipment. The opportunity was taken to incorporate a degree of universality within the new machines, whilst keeping them as simple as possible. This was achieved.
It is important in the process of lapping that the swept path of the component across the two lapping plates – in this case a number of gauge blocks held in a carrier plate – is constantly changing and not repeatedly travelling over the same areas of the lapping plates. This was accomplished within the design of the machines with two distinctly different mechanical lapping motions, either of which could be used; the selection of a particular motion being somewhat dependant on the sizes of blocks being manufactured.
Almost as important as the gauge blocks themselves are the cases that contain them. Alan Browne Ltd. used handsome wooden cases made of a specially selected timber in order that the expensive contents should not be compromised in any way by moisture, dust, etc. A number of other gauge block manufacturers also used fine wooden cases, including the Pitter Gauge and Precision Tool Co. (PVE) Ltd., London. Matrix, interestingly, departed from this trend and used a type of Bakelite for its cases. Whilst Bakelite is perhaps an ideal material, it is aesthetically somewhat unappealing, and does not compare with say a nicely grained and polished wooden case!
Moisture, temperature changes, dust and acids from human fingers are the great enemies of gauge blocks, particularly metallic ones, and every effort should be made to wipe gauge blocks thoroughly after use with a chamois leather or soft cloth. Oils are not necessarily good preventatives against corrosion as they often contain acids and additives that can cause staining. A smear of petroleum jelly may be the best option for long term storage.
The above is a very brief resume of the history and use of precision gauge blocks, with particular reference to a couple of noted Warwickshire companies who once manufactured them. Alan Browne Ltd. still operates at Blackdown as a precision lapping company, but no longer manufactures complete gauge blocks or offers certified calibration services.
The author is indebted to Michael Doody and the WIAS webmaster for their kind assistance in the preparation of this paper.
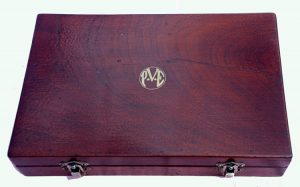
Gauge Block Outer Case (PVE) 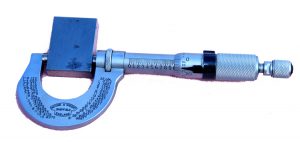
A 1” Gauge Block being used to check a 0-1” M&W Micrometer (This particular gauge Block is actually marked BTH – not PVE!) 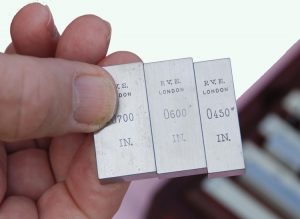
Three Gauge Blocks wrung together to make up the dimension 1.750 inches 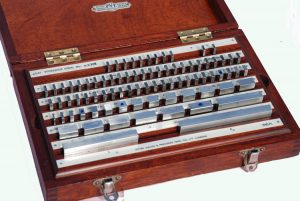
A Set of 81 Workshop Grade Gauge Blocks by the Pitter Gauge and Precision Tool Co Ltd., London (PVE) 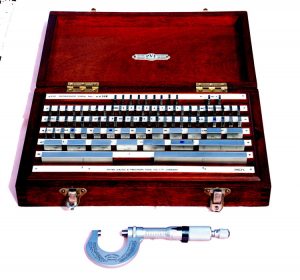
PVE Gauge Block Set together with a 0-1” Moore &Wright Micrometer
Copyright © J F Willock August 2021
